
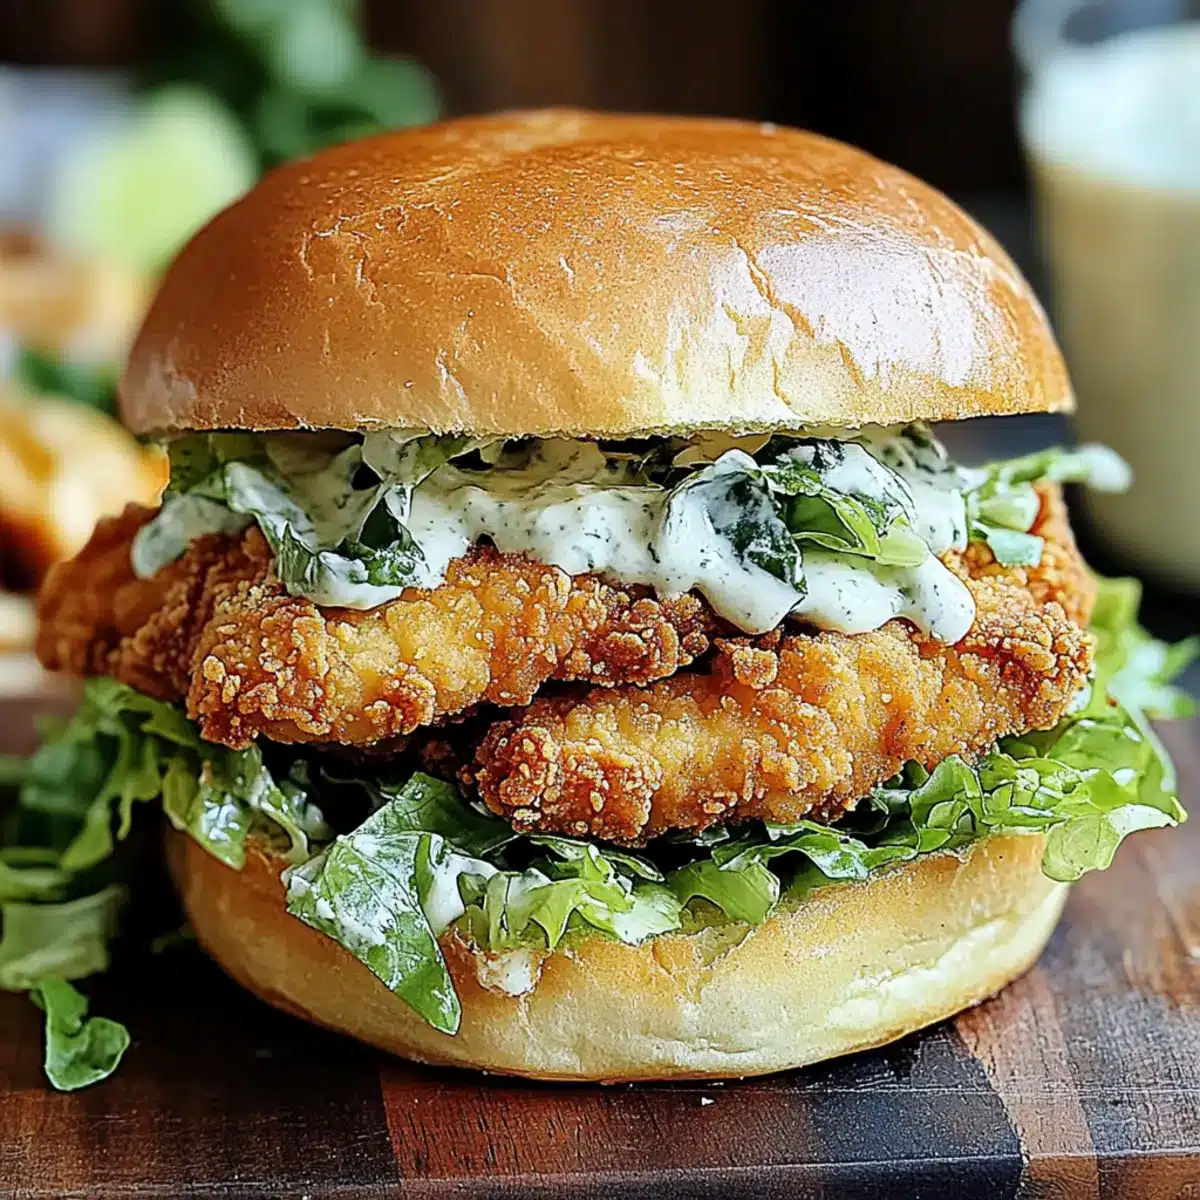
As I sliced into this Ultimate Chicken Caesar Sandwich, the crispy texture of the golden-brown chicken cutlet almost sang with delight. Transforming the classic salad into a handheld feast, this recipe brings together comfort food and convenience in a way that’s sure to satisfy those pesky cravings. Packed with flavor thanks to a creamy homemade Caesar dressing and fresh romaine lettuce, it’s a delicious twist that feels just as indulgent as a night out but can be made right in the comfort of your kitchen. Whether you opt for crispy chicken tenders for a quicker fix or go for grilled chicken for a lighter touch, this sandwich is both customizable and soul-warming. Curious how to make this masterpiece at home? Let’s dive into the details!

Why is this Chicken Caesar Sandwich a must-try?
Unmatched Flavor: Each bite of this sandwich bursts with flavors from perfectly seasoned chicken and creamy Caesar dressing.
Customizable Options: You can easily tweak this recipe by using crispy chicken tenders or grilled chicken for a healthier twist—perfect for any preference!
Hearty Satisfaction: This sandwich transforms a light salad into a filling meal, making it ideal for lunch or dinner cravings.
Quick to Prepare: With the right techniques, you’ll have a mouth-watering sandwich ready in no time, especially if you whip up a batch of Garlic Butter Chicken the night before!
Versatile Side Pairings: Serve it with crispy fries or a fresh salad for a complete dining experience.
Chicken Caesar Sandwich Ingredients
• Get ready to gather fresh flavors!
For the Chicken
• Boneless, Skinless Chicken Breasts – The star of the show, ensuring a juicy and crispy cutlet. Substitution: Use crispy chicken tenders for a faster option.
• All-Purpose Flour – Coats the chicken for that essential crispy layer.
• Salt – Enhances the overall flavor, making every bite delicious.
• Black Pepper – Adds a mild heat; adjust according to your spice preference.
• Garlic Powder – Provides a savory depth essential for flavor.
• Paprika – Brings a subtle smokiness to the breading mix.
• Large Eggs (beaten) – Serves as the glue, binding the breadcrumbs to the chicken.
• Panko Breadcrumbs – Key for achieving that extra crispy texture; they outperform regular breadcrumbs.
• Grated Parmesan Cheese – Boosts flavor in both the breading and the dressing.
For the Dressing
• Mayonnaise – The creamy base for the Caesar dressing. Substitution: Use Greek yogurt for a lighter option.
• Lemon Juice – Adds brightness and acidity to elevate the dressing.
• Dijon Mustard – Infuses tang and extra depth of flavor.
• Minced Garlic – Fresh garlic provides a punch to the dressing.
• Worcestershire Sauce – Enhances umami and complexity; feel free to omit if desired.
For Assembling
• Sandwich Buns (brioche or favorite) – Holds this delightful sandwich together; toast them for the best results.
• Chopped Romaine Lettuce – Delivers that signature crunch and freshness.
• Grated Parmesan Cheese (for garnish) – Elevates both the presentation and flavor.
Step‑by‑Step Instructions for Ultimate Chicken Caesar Sandwich
Step 1: Prepare Chicken
Start by placing your boneless, skinless chicken breasts between two pieces of plastic wrap. Pound the chicken to a uniform 1/2-inch thickness using a meat mallet, ensuring even cooking. This step helps achieve that perfect crispy texture for your chicken cutlet in the Ultimate Chicken Caesar Sandwich.
Step 2: Set Up Breading Station
Create a breading station by setting out three shallow dishes. In the first dish, combine all-purpose flour, salt, black pepper, garlic powder, and paprika. In the second dish, beat the large eggs until smooth. Finally, mix panko breadcrumbs with grated Parmesan cheese in the third dish. This organized setup will streamline the breading process.
Step 3: Bread the Chicken
Dredge each chicken piece first in the seasoned flour, coating it thoroughly, then dip it in the beaten eggs letting excess drip off. Finally, press the chicken into the panko-Parmesan mix, ensuring an even layer for maximum crunch. Place the breaded chicken on a plate and let it rest for a few minutes to help the coating adhere better.
Step 4: Fry Chicken
Heat a generous amount of vegetable oil in a large skillet over medium heat until it shimmers, about 350°F (175°C). Carefully add the breaded chicken cutlets to the hot oil, frying for 3-4 minutes on each side until they are golden brown and reach an internal temperature of 165°F (74°C). Use tongs to transfer the chicken to a paper towel-lined plate to drain excess oil.
Step 5: Make Caesar Dressing
In a mixing bowl, whisk together mayonnaise, grated Parmesan, lemon juice, Dijon mustard, minced garlic, and Worcestershire sauce. Blend until smooth and creamy, adjusting seasoning as needed. This homemade Caesar dressing brings an incredible flavor to your Ultimate Chicken Caesar Sandwich, so don’t skip this delicious step!
Step 6: Toast Buns
While the chicken cools slightly, prepare your sandwich buns. Lightly toast them in another skillet or toaster until golden brown. This not only provides a nice texture but also helps prevent the buns from becoming soggy once you assemble the sandwich.
Step 7: Assemble Sandwich
Spread a generous layer of the creamy Caesar dressing on the bottom half of each toasted bun. Layer chopped romaine lettuce and then place the crispy chicken on top. Add a sprinkle of extra grated Parmesan for a touch of decadence. Press the top bun down gently to complete your Ultimate Chicken Caesar Sandwich.
Step 8: Serve Immediately
Cut your sandwich in half for easier handling, and serve it while the chicken is still warm and crispy. To complement your dish, consider serving with crispy fries or a fresh coleslaw for a perfect meal that brings that comforting yet indulgent feel of a classic Chicken Caesar Sandwich.

Expert Tips for Chicken Caesar Sandwich
-
Even Thickness: Ensure chicken is pounded to 1/2-inch thickness for evenly cooked, crispy cutlets. This helps prevent undercooking or overcooking in your Chicken Caesar Sandwich.
-
Don’t Overcrowd: Fry chicken in batches if necessary; overcrowding the pan can lower the oil temperature, resulting in soggy, less crispy cutlets.
-
Resting Time: Allow your breaded chicken to rest for a few minutes before frying. This step helps the coating stick better and ensures maximum crunch when biting into your sandwich.
-
Homemade Dressing: Don’t skip the homemade Caesar dressing! Store-bought can’t compete with the freshness and flavor of this easy recipe, enhancing your Chicken Caesar Sandwich delightfully.
-
Customizable Crunch: For extra crunch, consider adding crispy croutons or bacon bits to the sandwich before serving for a delicious twist.
Chicken Caesar Sandwich Variations
Invite your taste buds to play with these delightful twists on your Chicken Caesar Sandwich!
- Grilled Chicken: Swap fried chicken for grilled chicken for a lighter, smoky flavor that pairs beautifully with the creamy dressing.
- Buffalo Twist: Stir your fried chicken in buffalo sauce for a spicy twist that adds a kick to the classic flavors.
- Tortilla Wrap: Use a large tortilla instead of buns to create a heartier Chicken Caesar Wrap; it’s easy to grab and go!
- Veggie Delight: Add sliced avocado and fresh spinach for extra creaminess and nutrients, making this sandwich more substantial and healthful.
- Caesar Sliders: Create mini sliders by using small buns; perfect for parties or a fun family dinner while maintaining that delicious taste!
- Cheese Boost: Try adding mozzarella or feta cheese to your sandwich for an extra cheesy goodness that enhances each bite; a gourmet touch!
- Herb Infusion: Incorporate fresh herbs like basil or cilantro into your dressing to brighten up the flavors, giving your sandwich a fresh garden twist.
- Crispy Toppings: Top with crispy bacon or homemade croutons for an extra crunch that will make your Chicken Caesar Sandwich simply irresistible.
Feel free to mix and match these options, and if you’re looking for more chicken inspiration, check out our Chicken Enchiladas Comfort or the rich flavors of Cowboy Butter Chicken. Happy cooking!
What to Serve with Ultimate Chicken Caesar Sandwich
Create a memorable meal by pairing this delightful sandwich with sides that elevate its deliciousness and comfort.
-
Crispy French Fries: The salty crunch of fries complements the sandwich’s creamy texture while satisfying those crispy cravings with each bite.
-
Tangy Coleslaw: A fresh coleslaw adds a zesty crunch, balancing the richness of the dressing and giving a refreshing contrast with every mouthful.
-
Garlic Bread: The warm, buttery flavor of garlic bread pairs beautifully, enhancing the savory experience and ensuring no sauce goes to waste with this tasty side.
-
Caprese Salad: This light, fresh salad offers juicy tomatoes and creamy mozzarella, adding a burst of flavor that contrasts perfectly with the hearty sandwich.
-
Sweet Potato Wedges: Roasted sweet potato wedges provide a sweet touch and a delightful crunch, making a cozy and nutritious addition to your meal.
-
Sparkling Lemonade: A refreshing glass of sparkling lemonade brings a bubbly lift, perfectly complementing the savory elements of your Chicken Caesar Sandwich.
-
Cheesy Garlic Breadsticks: The cheesy, garlicky goodness of breadsticks is hard to resist, making them a perfect sharing option that pairs wonderfully with the sandwich’s flavors.
Make Ahead Options
These Ultimate Chicken Caesar Sandwiches are perfect for meal prep enthusiasts! You can prepare the crispy chicken cutlets up to 24 hours in advance. Simply follow the breading and frying steps, then allow the chicken to cool before wrapping it tightly in plastic wrap and refrigerating. To maintain that delightful crunch, assemble the sandwiches just before serving by toasting the buns and spreading the dressing on each one. Additionally, you can make the homemade Caesar dressing 3 days ahead; store it in an airtight container in the fridge. When you’re ready to enjoy, simply reheat the chicken in a hot skillet for a few minutes, and assemble your sandwiches for a quick and satisfying meal that doesn’t sacrifice flavor or quality!
How to Store and Freeze Chicken Caesar Sandwich
Fridge: Store leftover Chicken Caesar Sandwich in an airtight container for up to 2 days. Reheat gently in the microwave, maintaining the sandwich’s texture.
Freezer: You can freeze the chicken cutlets separately for up to 3 months. Wrap tightly in plastic wrap, then place in a freezer bag. Thaw in the fridge before reheating.
Reheating: When ready to eat, reheat cutlets in the oven at 375°F (190°C) for about 10-15 minutes to regain crispiness before assembling your sandwich.
Assembly Tips: Consider storing the dressing and lettuce separately to keep your Chicken Caesar Sandwich fresh and crisp until ready to eat.

Chicken Caesar Sandwich Recipe FAQs
What type of chicken should I use for the Chicken Caesar Sandwich?
For the ultimate experience, I recommend using boneless, skinless chicken breasts pounded to 1/2-inch thickness. If you’re in a hurry, crispy chicken tenders work beautifully as a quicker alternative!
How long can I store the leftover Chicken Caesar Sandwich?
Absolutely! You can store the leftover sandwich in an airtight container in the refrigerator for up to 2 days. Reheat gently in the microwave, but be cautious to avoid making the bread soggy.
Can the chicken cutlets be frozen?
Yes, definitely! You can freeze the chicken cutlets separately for up to 3 months. Wrap them tightly in plastic wrap, and place them in a freezer bag. When ready to enjoy, thaw in the fridge overnight, then reheat in the oven to retain that crispy texture.
What should I consider for a healthier version of Chicken Caesar Sandwich?
To make a lighter version, opt for grilled chicken instead of fried. You can also substitute mayonnaise with Greek yogurt in the dressing. These simple swaps maintain flavor while reducing calories and fat.
How can I ensure the breading stays crispy when reheating?
To keep the breading crispy, avoid reheating the sandwich in the microwave. Instead, place the cutlets in the oven at 375°F (190°C) for about 10-15 minutes. This method restores the crunchiness and keeps your Chicken Caesar Sandwich feeling fresh!
Is Worcestershire sauce necessary in the dressing?
Not at all! While it adds a nice umami flavor, you may omit Worcestershire sauce if you prefer. The other ingredients in the dressing will still create a deliciously creamy Caesar taste that complements the sandwich perfectly.
Crispy Chicken Caesar Sandwich That Will Change Your Lunch Game
Ingredients
Equipment
Method
- Prepare Chicken: Pound chicken to a uniform 1/2-inch thickness using a meat mallet.
- Set Up Breading Station: Combine flour, salt, pepper, garlic powder, and paprika in the first dish. Beat eggs in the second dish. Mix panko with Parmesan in the third dish.
- Bread the Chicken: Dredge chicken in seasoned flour, dip in beaten eggs, then press into panko-Parmesan mix.
- Fry Chicken: Heat oil and fry chicken cutlets for 3-4 minutes on each side until golden brown and cooked through.
- Make Caesar Dressing: Whisk together mayonnaise, Parmesan, lemon juice, mustard, garlic, and Worcestershire sauce until smooth.
- Toast Buns: Lightly toast sandwich buns until golden brown.
- Assemble Sandwich: Spread Caesar dressing on the bottom bun, add lettuce, place chicken, and garnish with Parmesan.
- Serve Immediately: Cut sandwich in half and serve warm with fries or coleslaw.
Leave a Reply