
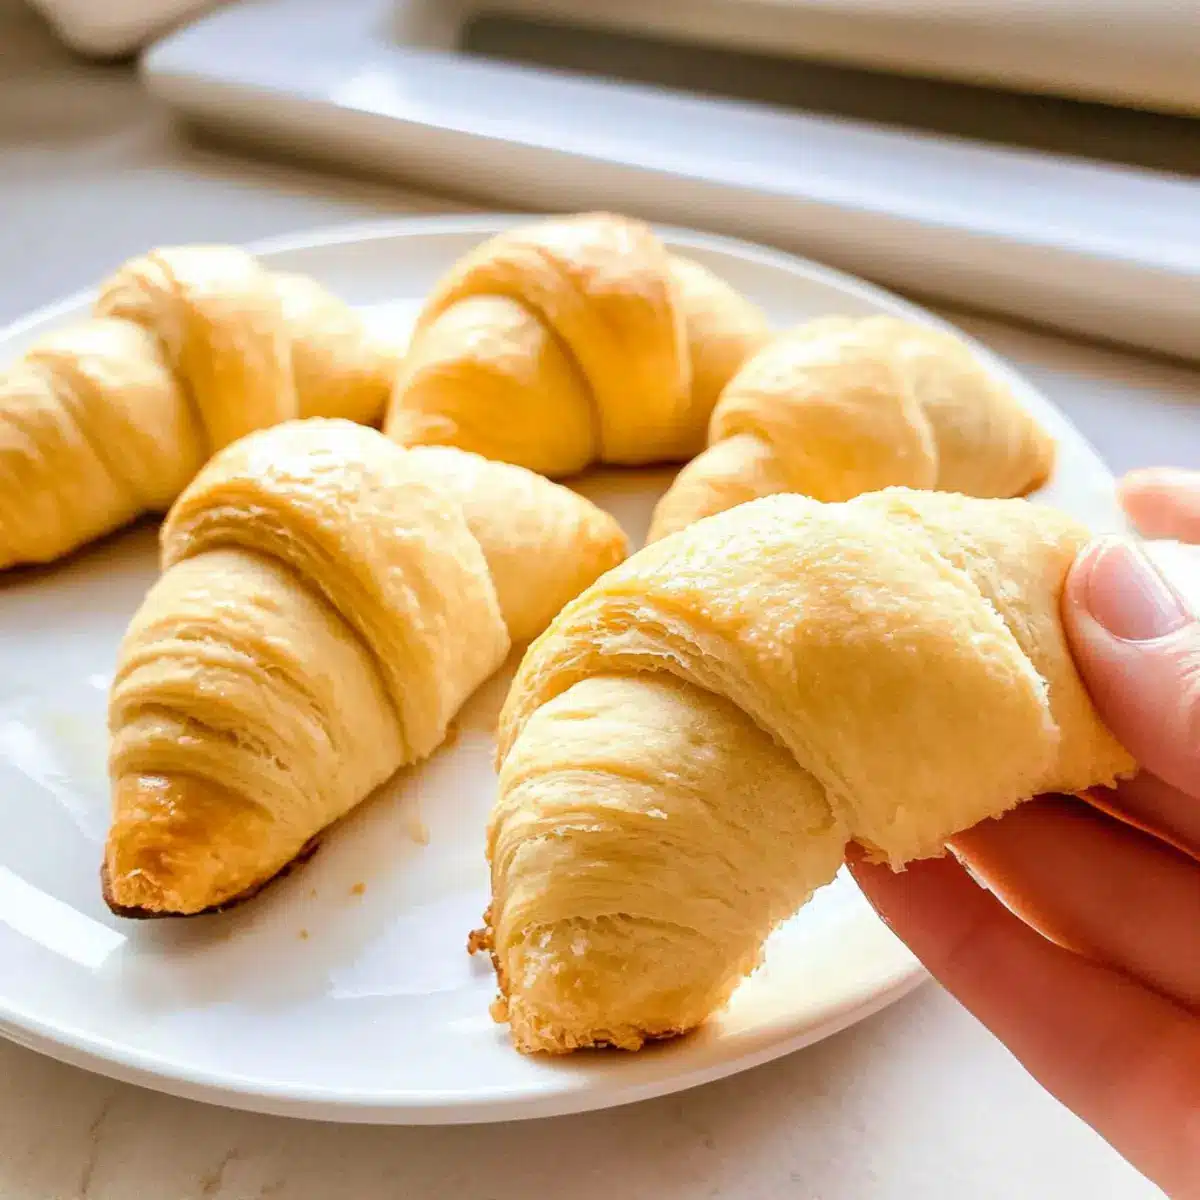
Have you ever faced the heartbreak of wanting warm, buttery rolls, only to be let down by gluten-free options? I was there too, until I discovered The Best Gluten Free Crescent Rolls. These soft and fluffy rolls are not only incredibly easy to throw together in just one hour, but they’re also versatile enough to be the star of various recipes, from cinnamon rolls to chicken roll-ups. Whether you’re looking for a comforting addition to your dinner or something fun to make on a lazy weekend, these crescent rolls are a delightful solution. With a hint of sweetness and a tender texture, they cater to those with dietary restrictions without any sacrifice in taste. Imagine serving these warm alongside your favorite soup or as a delightful snack any time! Ready to elevate your baking game? Let’s dive into the details!
Why Are These Rolls a Game Changer?
Simplicity at its finest: With just a few basic ingredients, you can whip up these gluten-free crescent rolls in under an hour. Incredible versatility: This dough isn’t just for crescent rolls; it can transform into sweet cinnamon rolls or savory chicken roll-ups! Irresistible texture: Enjoy that fluffy, tender bite without compromising on gluten-free needs, perfect for everyone at your table. Crowd-pleaser: No one will guess these are gluten-free—they’re that good! Whether you’re pairing them with soup or serving as a fun appetizer, these rolls are bound to steal the show. If you love experimenting with gluten-free options, don’t miss out on trying my Gluten Free Vegan cookies or easy Gluten Free Pancakes. Your taste buds will thank you!
The Best Gluten Free Crescent Rolls Ingredients
• Want to create these fluffy delights? Here’s what you need!
For the Dough
- High-Quality Gluten Free Flour Mix – This is the backbone of your rolls; brands like gfJules or Better Batter work wonderfully.
- Instant Yeast – Essential for a light and fluffy texture; there’s no need to proof it before mixing!
- Sugar or Honey – Adds a touch of sweetness and aids in browning; either option gives delicious results.
- Baking Powder – Ensures your rolls rise beautifully, resulting in that soft texture we love.
- Salt – Enhances flavor; if using unsalted butter or oil, adjust accordingly.
- Warm Water – Activates the yeast; aim for a temperature just warmer than room temperature.
- Large Egg – Provides moisture and structure; can be swapped with an egg replacer for a vegan alternative.
- Butter or Neutral Oil – Adds richness; for a dairy-free version, try using Melt brand dairy-free butter.
- Psyllium Husk Powder (optional) – Helps achieve a bread-like texture that’s simply irresistible.
For Dusting
- Potato or Tapioca Starch – Keeps the dough from sticking and makes handling easier.
These easy-to-follow ingredients will help you master The Best Gluten Free Crescent Rolls that everyone in the family will love!
Step‑by‑Step Instructions for The Best Gluten Free Crescent Rolls
Step 1: Combine Dry Ingredients
In a stand mixer bowl, combine the high-quality gluten-free flour mix, instant yeast, sugar or honey, baking powder, and salt. Mix these dry ingredients on low speed until well-blended, which should take about 1-2 minutes. This mixture provides the essential structure for your crescent rolls, ensuring they rise beautifully when baked.
Step 2: Mix the Dough
Pour in warm water, then add the large egg and your choice of butter or neutral oil. Use the paddle attachment to mix the ingredients on medium speed until a thick, sticky dough forms, which usually takes about 3-5 minutes. The dough will be quite pliable but should retain its moisture, ready for shaping into rolls.
Step 3: Prepare the Surface
Lightly dust a clean work surface with potato or tapioca starch to prevent sticking. Carefully scrape the sticky dough from the mixer bowl onto the floured surface. Shape it gently into a ball and sprinkle the top with a bit more starch. This will keep the dough manageable as you roll it out into the crescent shape.
Step 4: Roll Out the Dough
Using a rolling pin, roll the dough out into a 14-inch circle, ensuring it remains evenly thick for even baking. If the dough sticks, add a little more starch as needed. The visual cue here is a smooth surface that easily lifts from the counter, preparing it for the next step of cutting into wedges.
Step 5: Cut and Shape the Rolls
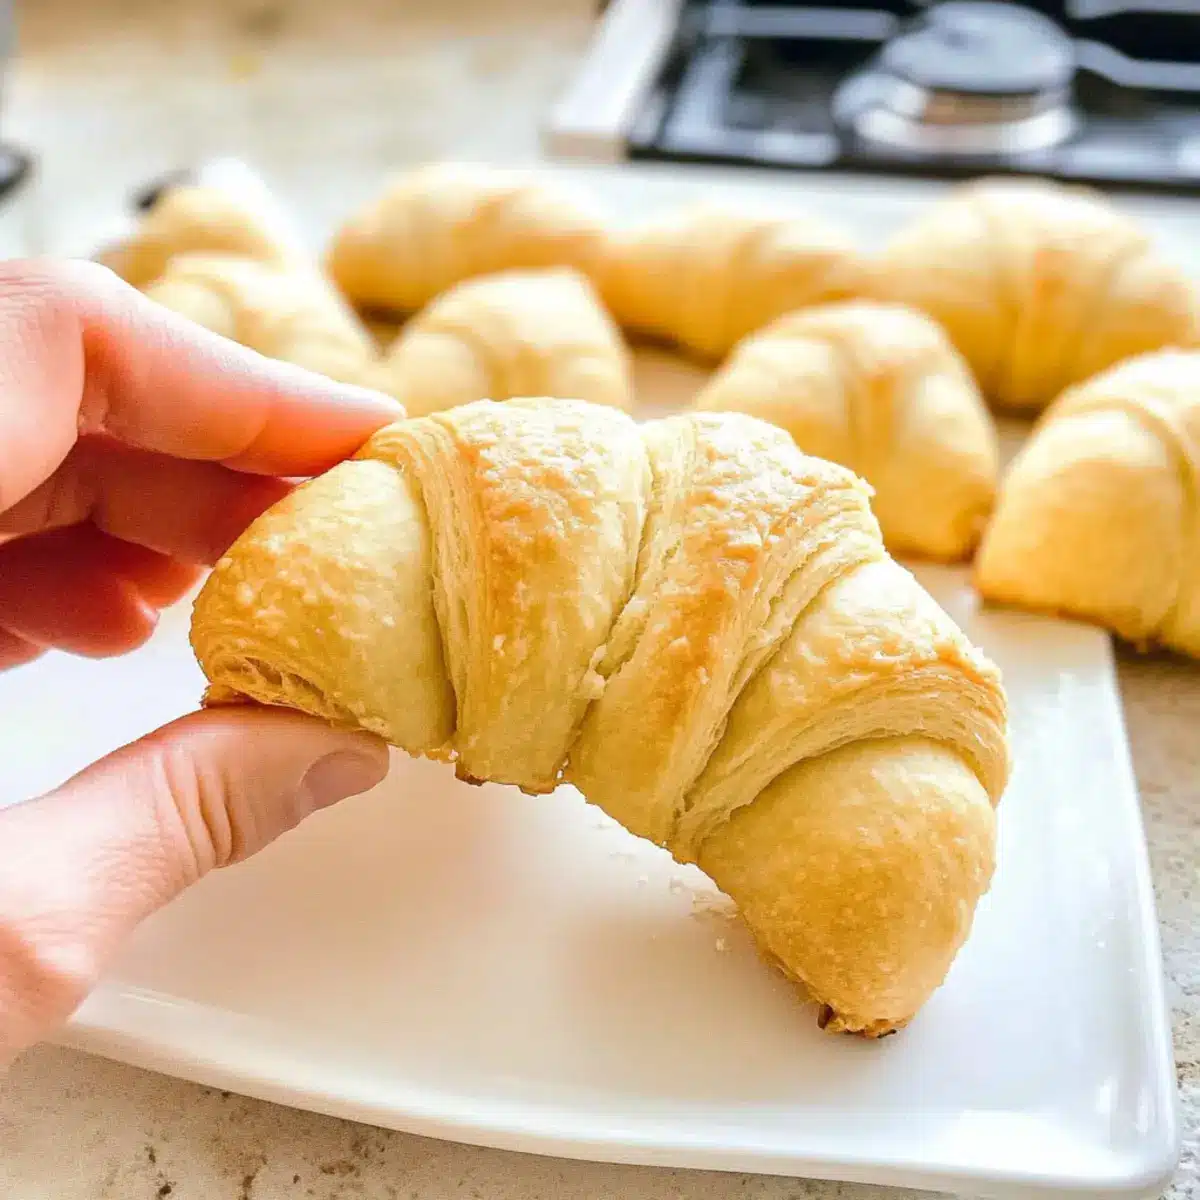
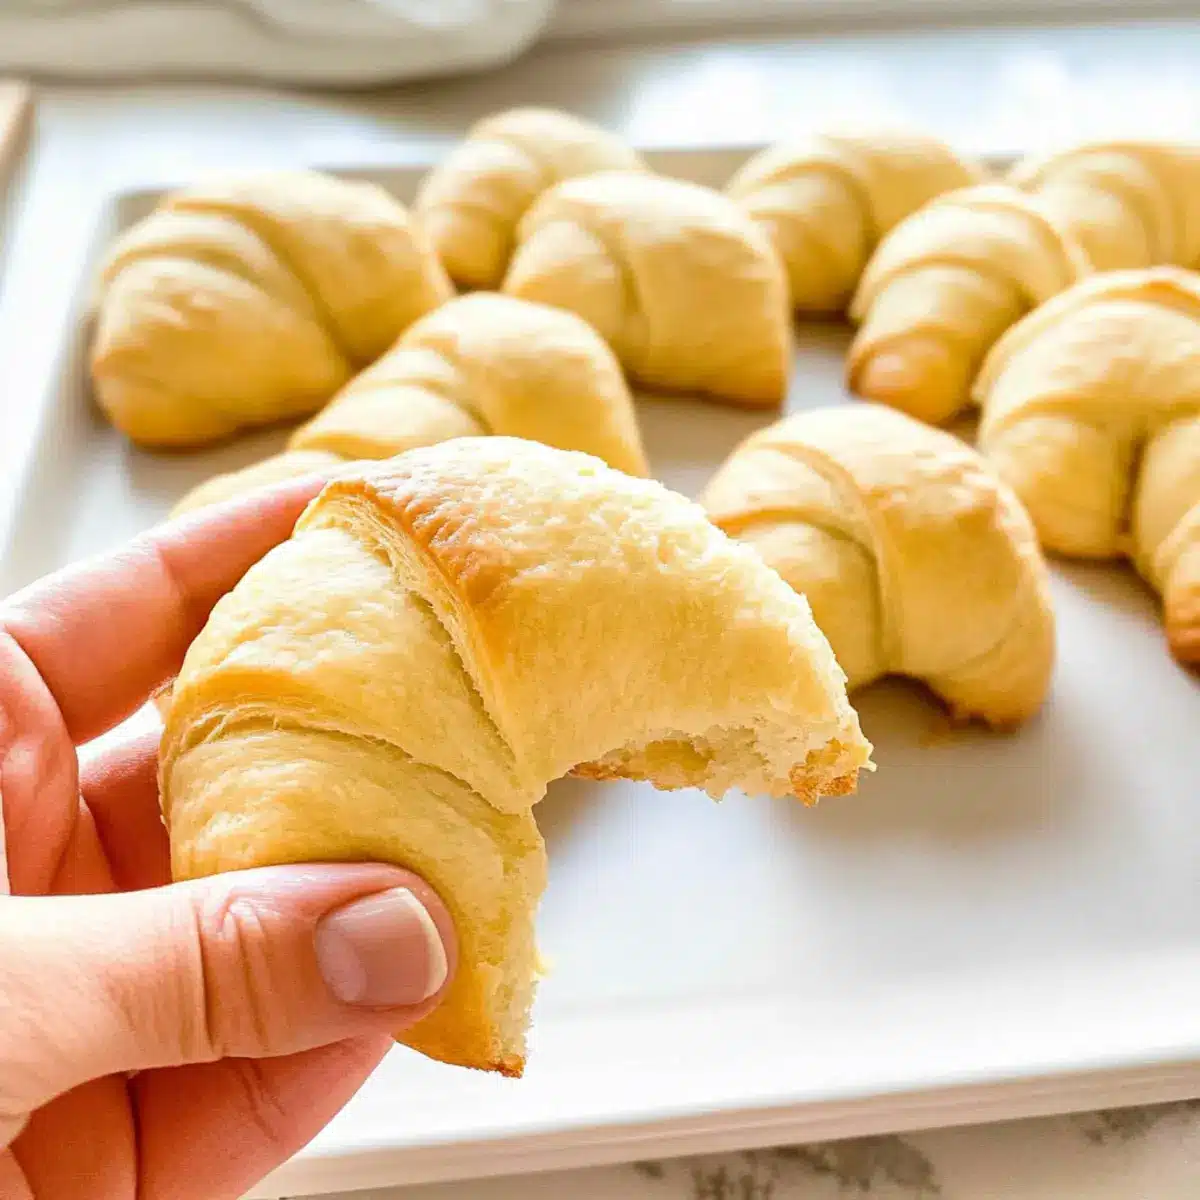
With a sharp pizza cutter, slice the rolled-out dough into 8 wedges. Start at the wide end of each wedge and roll it towards the point, forming the crescent shape. Place the shaped rolls on a baking sheet lined with parchment paper, ensuring they’re spaced for expansion during rising and baking.
Step 6: Let the Rolls Rise
Cover the shaped crescent rolls with a clean kitchen towel, allowing them to rise in a warm area for about 30-45 minutes. You’ll know they’re ready when they’ve doubled in size, appearing puffed and fluffy. This crucial step gives The Best Gluten Free Crescent Rolls their delightful texture.
Step 7: Bake the Rolls
Preheat your oven to 350°F (175°C). Once the rolls have risen properly, place them in the oven and bake for 9-12 minutes. Keep an eye on their color; they should be soft and lightly golden but not overbaked. Pull them out when they’re just set and fragrant, ready to be served warm!
Make Ahead Options
These Gluten Free Crescent Rolls are perfect for busy home cooks looking to save time! You can prepare the dough up to 24 hours in advance by mixing all the ingredients and shaping the rolls, then refrigerate them covered in plastic wrap. To maintain their wonderful texture, ensure they are tightly wrapped to prevent drying out. When you’re ready to bake, simply remove the rolls from the fridge, allow them to rise in a warm spot for about 30-45 minutes, then bake as directed. This method allows you to enjoy fresh, fluffy crescent rolls with minimal effort, making your mealtime stress-free and delicious!
The Best Gluten Free Crescent Rolls Variations
Feel free to explore and customize these delightful rolls to suit your taste preferences and dietary needs!
-
Cinnamon Rolls: Roll up the dough with a sprinkle of cinnamon and sugar before shaping, then drizzle with icing for a sweet twist.
-
Savory Chicken Roll-Ups: Spoon cooked chicken and your choice of veggies onto the dough, roll them up, and bake for a heartwarming meal.
-
Dairy-Free: Use a high-quality dairy-free butter or oil such as the Melt brand, keeping these rolls rich and creamy without the dairy.
-
Egg-Free: For a vegan option, substitute the egg with 1 tablespoon of ground flaxseed mixed with 3 tablespoons of water. Let it sit for 5 minutes to thicken.
-
Herb-Infused: Add dried herbs like rosemary or thyme directly into the dough for a fragrant and flavorful roll that pairs perfectly with soups.
-
Mini Monkey Bread: Shape the dough into small balls, coat with cinnamon-sugar, and bake them together in a bundt pan for a fun pull-apart treat.
-
Cheesy Rolls: Incorporate your favorite cheese (dairy-free if needed) into the dough before rolling out, giving each bite a gooey surprise.
-
Spicy Kick: Add chopped jalapeños or a dash of cayenne pepper to the dough for a spicy version that will liven up any meal.
With these variations, you can enjoy The Best Gluten Free Crescent Rolls in countless ways! If you’re in the mood for something sweet, don’t forget to check out my Gluten Free Vegan cookies. And when breakfast calls, my easy Gluten Free Pancakes are perfect as well!
What to Serve with Easy Gluten Free Crescent Rolls
These delightful crescent rolls are not just for your table but open the door to a world of flavorful pairings to create a memorable dining experience.
-
Creamy Mushroom Soup: The velvety smoothness of this soup pairs perfectly with the rolls, perfect for dipping. A comforting choice on chilly days!
-
Garlic Roasted Vegetables: Crisp-tender veggies with a hint of garlic create a harmonious balance, enhancing the buttery flavor of the rolls.
-
Savory Chicken Salad: The lightness of chicken salad complements the rolls beautifully. Serve it in a sandwich style for a delightful twist.
-
Balsamic Glazed Brussels Sprouts: Their slightly sweet and tangy flavor cuts through the richness of the rolls, creating an exciting flavor contrast.
-
Fresh Mixed Greens Salad: A simple salad with a tangy vinaigrette adds freshness and balance to your meal. Enjoy the crisp textures alongside the soft rolls!
-
Buttery Honey Glaze: Drizzling some honey over warm rolls creates a sweet touch. It’s a quick yet fancy way to elevate your rolls into a delicious dessert-like treat.
-
Warm Apple Cider: Celebrate the season with a cozy drink that complements the flavors of the rolls, warming your heart as well.
-
Chocolate Chip Cookies: For a sweet end to your meal, serve these beloved treats for dessert! Both gluten-free and oh-so-delicious, it’s the perfect treat.
Storage Tips for The Best Gluten Free Crescent Rolls
- Room Temperature: Store leftover rolls in an airtight container for up to 2 days. This keeps them soft and fresh, just like when they first came out of the oven.
- Fridge: If you want to keep them longer, you can refrigerate for up to 5 days. However, be aware that refrigeration may slightly alter their texture.
- Freezer: For long-term storage, freeze the rolls in a single layer on a baking sheet before transferring them to a freezer bag. They can be frozen for up to 3 months.
- Reheating: To enjoy the rolls again, wrap them in foil and heat at 325°F for about 5-10 minutes. This will help restore their fluffy texture and delicious flavor from The Best Gluten Free Crescent Rolls!
Expert Tips for The Best Gluten Free Crescent Rolls
- Choose Quality Flour: Opt for a gluten-free flour blend with xanthan gum for the best structure and texture in your crescent rolls.
- Perfectly Warm Water: Ensure the water is just warmer than room temperature; too hot can kill the yeast, while too cold won’t activate it properly.
- Watch Baking Time: Keep an eye on the rolls towards the end of baking; gluten-free options can dry out quickly if overbaked.
- Dough Handling: Remember, the dough is sticky! Using a pie bag or well-floured hands makes shaping the rolls easier and mess-free.
- Experiment with Fillings: Don’t hesitate to get creative; this dough can also be filled with sweet or savory ingredients for delightful variations!
The Best Gluten Free Crescent Rolls Recipe FAQs
How do I choose the best gluten-free flour for these rolls?
Absolutely! The flour you choose is crucial for the structure of your gluten-free crescent rolls. I recommend using high-quality blends like gfJules or Better Batter, which often contain xanthan gum. This ingredient helps mimic the elasticity found in wheat flour, ensuring your rolls are fluffy and tender.
What’s the best way to store leftover crescent rolls?
You can store leftover rolls in an airtight container at room temperature for 1-2 days for optimal freshness. If you want to extend their life, place them in the fridge for up to 5 days, though this might slightly change their texture. Wrap them well to avoid drying out!
Can I freeze the dough or the baked rolls?
Yes, you can freeze both! For the best Gluten Free Crescent Rolls, freeze the shaped, unbaked rolls in a single layer until firm, then transfer to a freezer bag for up to 3 months. When you’re ready to bake, let them thaw in the fridge overnight and then let them rise for about 30 minutes before baking. If you prefer freezing baked rolls, wrap them individually after they cool, and reheat wrapped in foil at 325°F for about 5-10 minutes.
What should I do if my dough is too sticky?
Very! If your dough feels overly sticky, this is common with gluten-free recipes. Sprinkle more potato or tapioca starch on your work surface and on your hands while shaping. If needed, you can also add a bit more gluten-free flour during mixing but do so gradually to avoid a dry dough.
Are there any allergy considerations for this recipe?
Absolutely! This recipe can be adjusted for various dietary needs. If you’re looking for a dairy-free option, I recommend using Melt brand dairy-free butter. Additionally, you can substitute the egg with a flaxseed or chia seed mixture (1 tablespoon of flaxseed meal or chia seeds mixed with 3 tablespoons of water) to make it vegan-friendly!
How can I tell when the crescent rolls are done baking?
Check for visual cues! Your crescent rolls should be lightly golden but soft to the touch. If you gently press the top, it should spring back. Gluten-free dough can dry out quickly, so keep an eye on them during the last few minutes of the baking time!

The Best Gluten Free Crescent Rolls - Soft, Fluffy Bliss
Ingredients
Equipment
Method
- In a stand mixer bowl, combine the gluten-free flour mix, instant yeast, sugar or honey, baking powder, and salt. Mix on low speed until well-blended (1-2 minutes).
- Pour in warm water, add the large egg and butter or neutral oil. Mix on medium speed until a thick, sticky dough forms (3-5 minutes).
- Dust a clean work surface with potato or tapioca starch, scrape the dough onto it, shape into a ball, and sprinkle more starch on top.
- Roll the dough out into a 14-inch circle using a rolling pin. Add more starch if needed to prevent sticking.
- Cut the dough into 8 wedges with a sharp pizza cutter, and roll each wedge from the wide end to the point to form crescent shapes.
- Place the shaped rolls on a baking sheet lined with parchment paper, spaced for expansion.
- Cover the rolls with a clean kitchen towel and let rise in a warm area for 30-45 minutes until doubled in size.
- Preheat the oven to 350°F (175°C) and bake the rolls for 9-12 minutes until soft and lightly golden.
Leave a Reply