
“Mom, can we make those bunny tails again?” My little one’s eyes sparkled with excitement, and I couldn’t resist the nostalgia that enveloped me. These Easter Bunny Coconut Tails have become a delightful tradition in our home, and for good reason! This no-bake treat is not only a joy to create, but it also brings an effortless cheer to our holiday gatherings. With a fun, chewy texture and a decorative pastel coconut coating, they’re a perfect canvas for customization—so kids and adults alike can unleash their creativity. Plus, they are incredibly simple to whip up, making them an effortless crowd-pleaser. Ready to hop into a delicious Easter adventure? Let’s get started on making our own adorable Easter Bunny Coconut Tails!
Why Are These Bunny Tails So Special?
Kid-Friendly Fun: These Easter Bunny Coconut Tails are perfect for little hands to help in the kitchen, making baking a delightful family activity.
No-Bake Joy: Enjoy a hassle-free experience; there’s no need for an oven, which means less mess and more fun!
Customizable Creations: Get creative with colors and flavors—experiment with different food dyes or add a splash of almond extract to make them uniquely yours.
Charming Presentation: Their pastel appearance makes them a stand-out centerpiece on any Easter dessert table, guaranteed to impress friends and family.
Make Ahead & Store: Prepare these treats a week in advance; they store beautifully in the fridge or freezer, perfect for busy holiday prep.
Delve into this recipe that combines simplicity and joy, just like my favorite Chocolate Cheesecake Decadent that always brings smiles!
Easter Bunny Coconut Tails Ingredients
For the Coconut Mixture
• 5 cups medium unsweetened shredded coconut – This forms the delightful base; switch to sweetened coconut for an extra sweet treat!
• 14 oz sweetened condensed milk – Acts as the binder, adding a creamy richness; opt for vegan condensed milk for a dairy-free version.
• 2 tbsp butter, melted & cooled – Adds moisture and richness; use plant-based butter if needed.
• 1 tsp vanilla extract – Elevates the flavor to make these tails even more delightful.
• ¼ cup confectioner’s sugar – Sweetens the mixture and improves texture; adjust if using sweetened coconut.
For the Coating
• 2 cups fine unsweetened shredded coconut – This will create a charming pastel coating for your Easter Bunny Tails.
• Liquid food coloring – Use your choice of colors to create beautiful pastel tones for extra festive flair.
These Easter Bunny Coconut Tails are a fantastic way to engage your creativity while making a tasty treat for your loved ones!
Step‑by‑Step Instructions for Easter Bunny Coconut Tails
Step 1: Prepare the Coconut Mixture
In a large mixing bowl, whisk together the sweetened condensed milk, melted butter, and vanilla extract. Aim for a smooth consistency, ensuring everything is well combined. Once mixed, gradually stir in the medium shredded coconut and confectioner’s sugar until the mixture becomes thick and sticky. This delightful blend should look cohesive and rich. Cover the bowl and chill it in the refrigerator for about 15 minutes to firm up.
Step 2: Color the Fine Coconut
While the mixture chills, divide the fine shredded coconut evenly into several small bowls. Add about 3-4 drops of liquid food coloring into each bowl, choosing colors that scream pastel for your Easter Bunny Coconut Tails. Use a fork or your fingers to mix thoroughly until each batch of coconut is evenly colored. Set these aside; they’ll add a beautiful finishing touch to your treats!
Step 3: Form the Bunny Tails
After chilling, remove the coconut mixture from the refrigerator. Using a small cookie scoop or measuring spoon, scoop out approximately 1½ teaspoons of the mixture and roll it into a ball using your hands. Work swiftly to maintain the shape as you progress. You should see a sticky texture that holds well. Repeat this process until all the mixture is shaped into balls, creating a fun assembly line of bunny tails.
Step 4: Coat the Bunny Tails
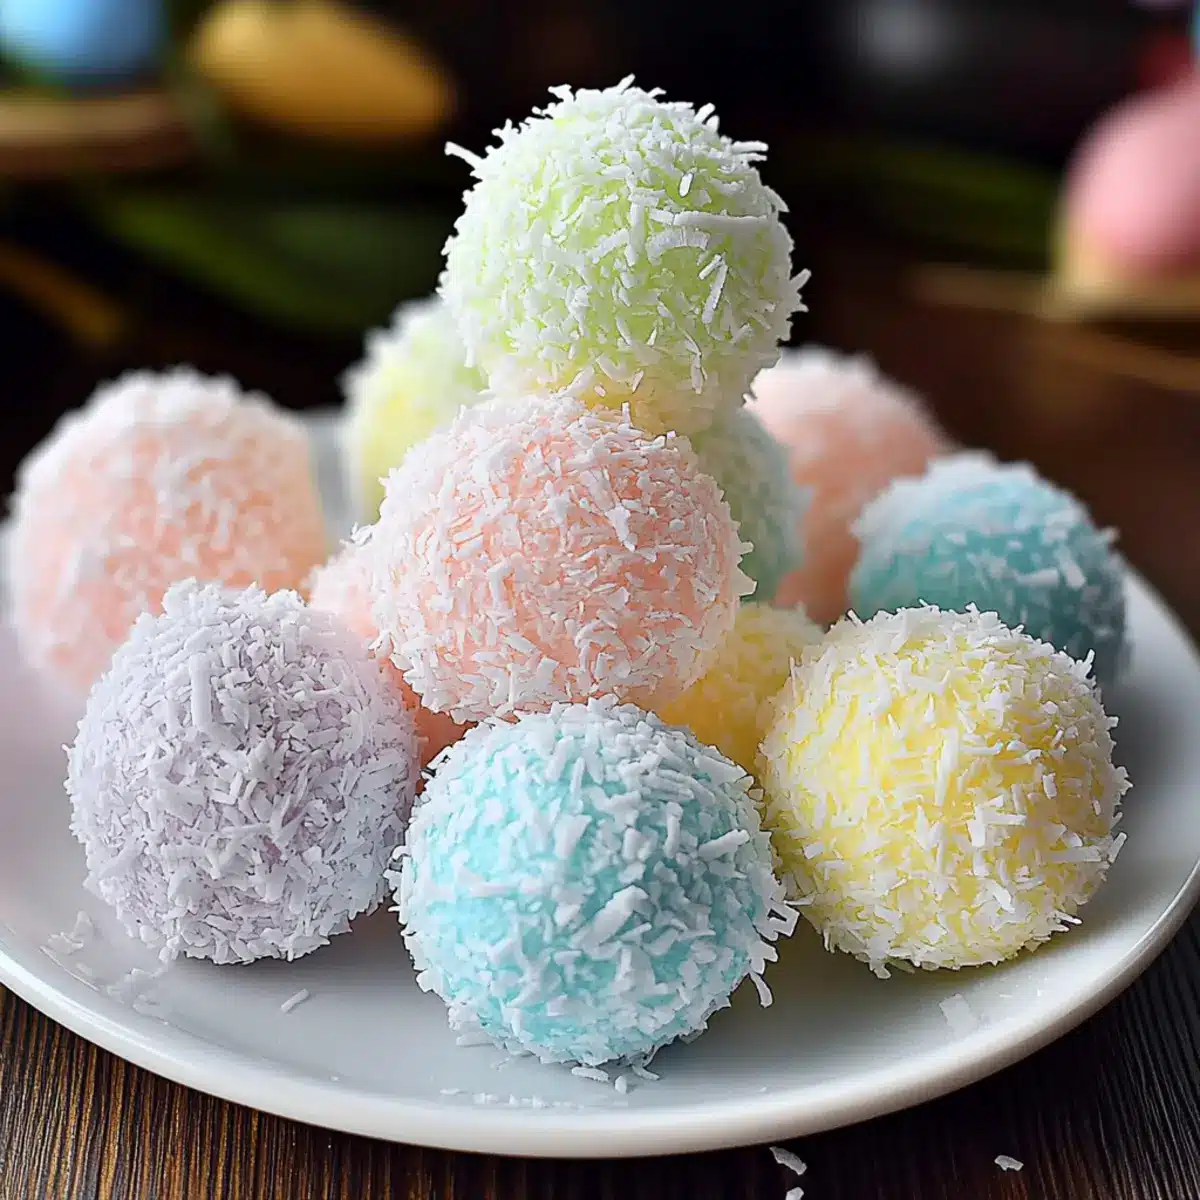
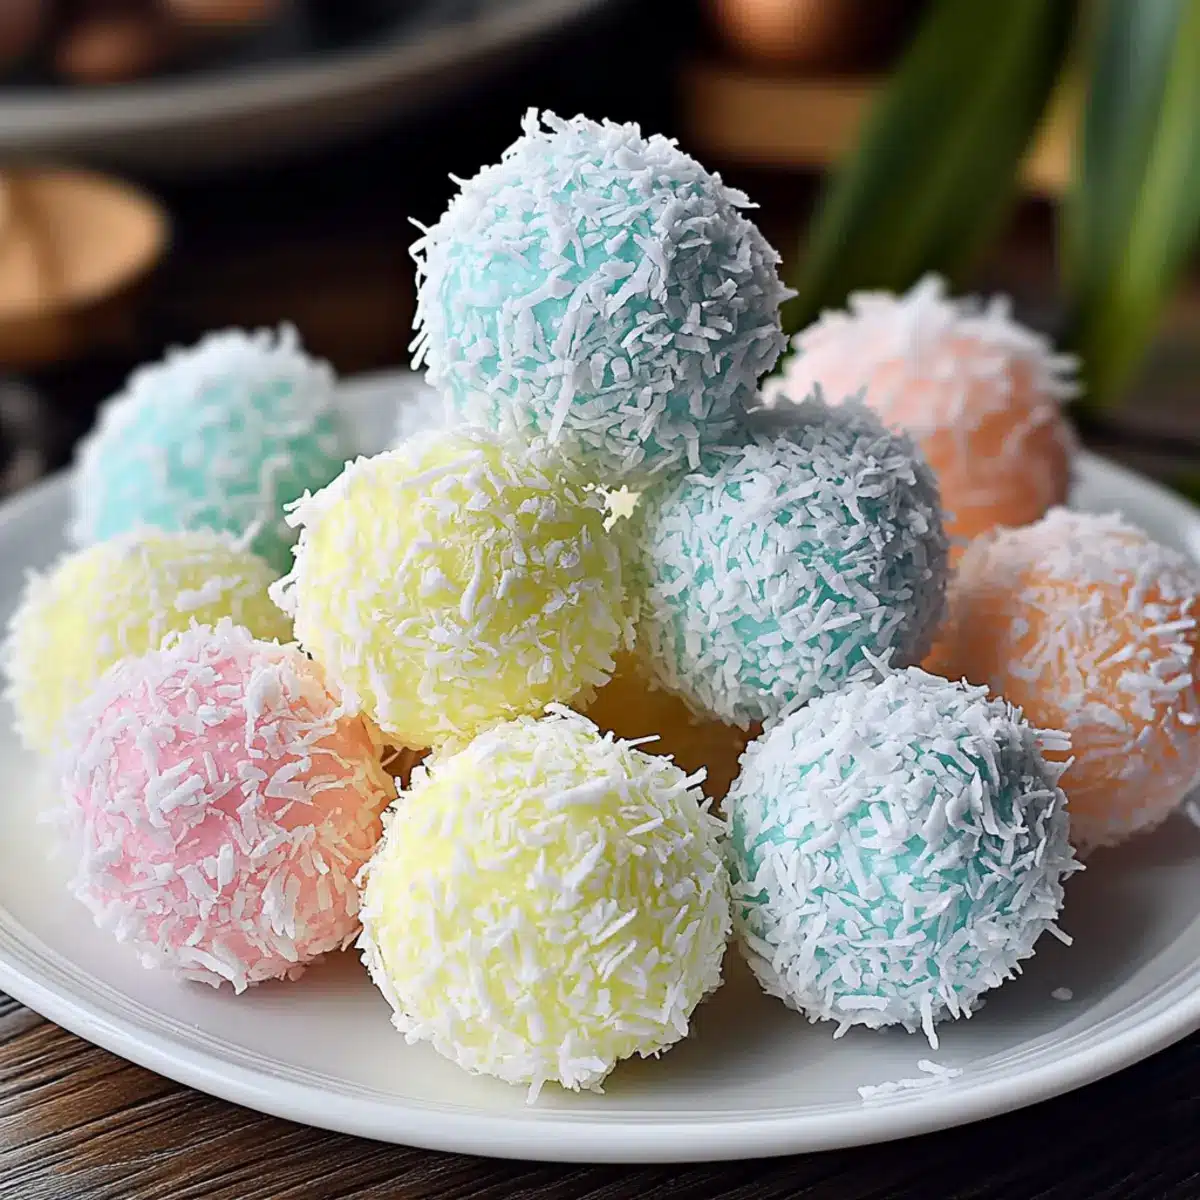
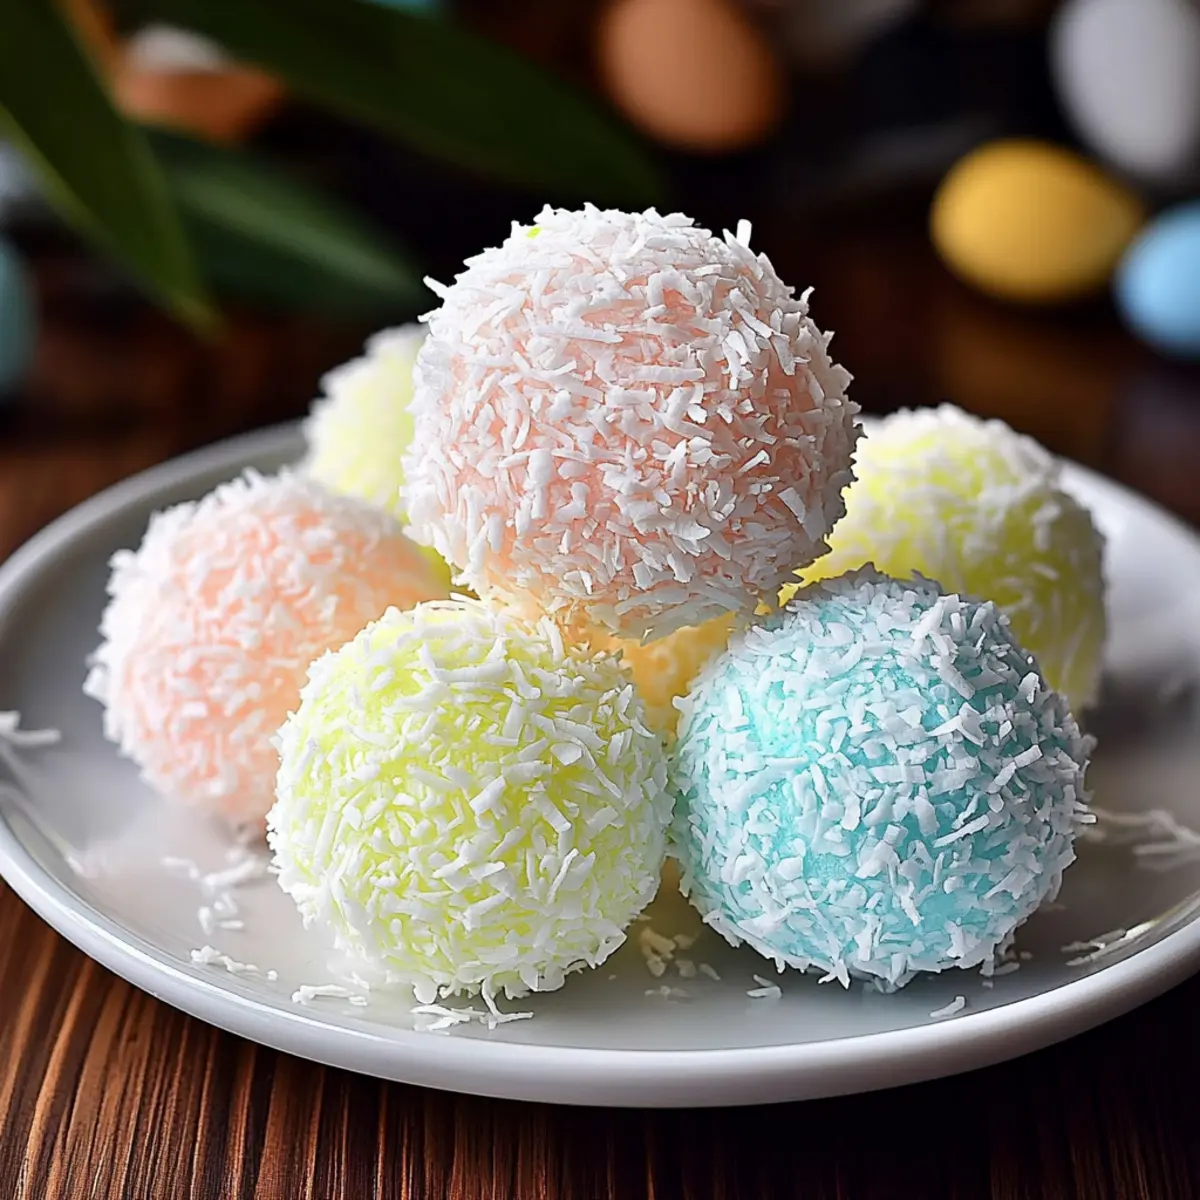
Once you have formed all the coconut balls, it’s time to dress them in colorful pastel coconut! Take each ball and roll it gently in your colored coconut mixture, ensuring it’s fully coated for eye-catching appeal. The vibrant colors make the Easter Bunny Coconut Tails visually delightful. Place the coated balls on a parchment-lined baking sheet, arranging them with some space in between for easy handling later.
Step 5: Chill and Set
Transfer the rolling baking sheet to the refrigerator, allowing the coated bunny tails to chill and set for about 1 hour. This step is essential to firm up the treats, ensuring they hold their shape when served. During this time, the flavor melds beautifully, and they’ll be ready to make a sweet appearance at your Easter festivities.
Step 6: Serve and Enjoy
After the chilling period, remove the Easter Bunny Coconut Tails from the refrigerator. Keep them stored in the fridge until you’re ready to serve, as this will maintain their soft and chewy texture. Present them on a festive platter, and watch the smiles on faces as these delightful treats become the highlight of your Easter celebration!

Make Ahead Options
These Easter Bunny Coconut Tails are a fantastic choice for meal prep and can be made up to 3 days in advance. To get started, prepare the coconut mixture and chill it, as directed in the recipe. Once chilled, roll the mixture into balls and place them on a parchment-lined baking sheet. Instead of coating them right away, cover the uncoated balls with plastic wrap and refrigerate until you’re ready to decorate. This way, you can coat them in colored coconut just before serving, ensuring they remain vibrant and fresh. Storing them uncoated helps preserve their soft texture, making your Easter festivities as stress-free and delightful as possible!
Expert Tips for Easter Bunny Coconut Tails
-
Ingredient Quality: Use high-quality coconut and sweetened condensed milk to enhance flavor and texture. Fresh ingredients make a noticeable difference in these no-bake treats.
-
Coloring Technique: For vibrant pastel colors, add liquid food coloring directly to coconut, mixing well. Avoid using too much, as it can make the coconut soggy; a few drops go a long way.
-
Stickiness Solution: If the coconut mixture is too sticky to handle, wet your hands slightly before rolling the bunny tails. This prevents sticking and makes shaping easier.
-
Chilling Time: Don’t skip the chilling step! Refrigerating the coconut tails for at least an hour helps them firm up, ensuring they hold their shape and texture when served.
-
Storage Tips: Keep your Easter Bunny Coconut Tails in an airtight container in the fridge to maintain freshness. These treats can be made ahead and stored for up to a week.
Easter Bunny Coconut Tails Variations
Feel free to make these delightful treats your own with these fun twists and substitutions!
-
Dairy-Free: Swap sweetened condensed milk with coconut or almond-based condensed milk, perfect for a vegan-friendly version.
-
Nutty Flavor: Add a splash of almond extract in place of vanilla for a unique nutty twist that pops with flavor.
-
Colorful Coating: Use colorful chocolate melts instead of coconut to coat the tails for a rich, chocolatey finish that’s irresistibly delicious.
-
Fruity Fun: Mix in dried fruit pieces, like chopped cherries or diced mango, for a surprising burst of flavor and added texture.
-
Crunchy Texture: Incorporate crushed nuts or graham crackers to the coconut mixture for delightful crunch and extra depth.
-
Holiday-Themed: Experiment with themed food colors, like orange and black for Halloween or red and green for Christmas, to keep your creations festive year-round!
-
Less Sweet: Choose unsweetened shredded coconut if you’re looking for a less sugary treat without compromising the playful texture.
-
Flavor Burst: For a tropical twist, stir in some finely shredded pineapple or a splash of coconut rum extract to amp up the coconut flavor.
These delicious variations allow you to personalize the Easter Bunny Coconut Tails, ensuring that each batch reflects your family’s tastes—just like our family favorite, Chocolate Cheesecake Decadent. Go ahead and indulge in a little inventiveness!
What to Serve with Easter Bunny Coconut Tails
Add a festive touch to your table with these adorable coconut treats that everyone will love!
- Spring Fruit Salad: Fresh, juicy fruits like strawberries and kiwi offer a vibrant contrast to the sweet coconut, enhancing the overall spring vibe.
- Mini Carrot Cake Muffins: These moist, spiced muffins provide a delightful complement to the light coconut flavor, appealing to all sweet tooths at your gathering.
- Creamy Vanilla Ice Cream: A scoop of creamy vanilla ice cream creates a luscious pairing, inviting delightful textures that balance beautifully against the chewy bunny tails.
- Chocolate-Dipped Strawberries: These decadent bites bring a rich chocolate flavor that pairs perfectly with the coconut’s sweetness, adding a touch of romance to your Easter feast.
- Lemonade Spritzer: A refreshing, bubbly lemonade spritzer is the perfect drink to cleanse the palate and keep the celebrations feeling light and festive.
- Mini Cheesecake Cups: Each rich, creamy cheesecake bite delivers a luscious layer to your dessert spread, ensuring your Easter guests have a delightful array of treats to choose from.
- Pineapple Juice Mocktail: Sweet and tangy, this mocktail offers a tropical twist that pairs beautifully with the coconut tails and enhances the holiday spirit.
- Carrot Sticks with Hummus: For a healthy crunch, serve crisp carrot sticks with a side of hummus, balancing out the sweetness and providing a nutritious option for guests.
- Pastel Cupcakes: These cheerful cupcakes with pastel frosting add visual charm and sweetness to complement your Easter Bunny Coconut Tails beautifully.
How to Store and Freeze Easter Bunny Coconut Tails
Fridge: Keep the Easter Bunny Coconut Tails in an airtight container for up to 1 week. A layer of parchment paper between treats helps prevent sticking.
Freezer: For longer storage, freeze the tails in a single layer on a baking sheet, then transfer to a freezer-safe container. They can last for up to 3 months.
Thawing: When ready to enjoy, thaw the coconut tails in the fridge for a few hours or until they soften to your desired texture.
Serving Tips: Always serve chilled to maintain their delightful chewy texture and vibrant appearance.
Easter Bunny Coconut Tails Recipe FAQs
How do I select the right coconut for this recipe?
Absolutely! When choosing shredded coconut, look for medium unsweetened shredded coconut for the base—it provides a great texture. If you’d like a sweeter twist, sweetened coconut can be used instead. Make sure it’s fresh, with no dark spots or an off smell.
What is the best way to store Easter Bunny Coconut Tails?
To keep your Easter Bunny Coconut Tails fresh, store them in an airtight container in the fridge. They will stay delightful for about 1 week. Layer the tails with parchment paper to prevent them from sticking together.
Can I freeze these treats?
Very! To freeze your Easter Bunny Coconut Tails, first place them in a single layer on a baking sheet and freeze until firm. Then, transfer them to a freezer-safe container, where they can be kept for up to 3 months. For best results, thaw them in the fridge until you achieve your desired texture before serving.
What if my coconut mixture is too sticky to work with?
If you find the coconut mixture is too sticky, don’t worry! Simply wet your hands slightly before rolling the bunny tails. This trick makes shaping much easier and prevents the mixture from sticking to your hands, allowing for those perfectly rounded treats.
Are there any dietary considerations I should keep in mind?
Absolutely! If you’re making these delicious Easter Bunny Coconut Tails for someone with dietary restrictions, consider using dairy-free condensed milk and plant-based butter to create a vegan-friendly version. Also, check for any coconut allergies, as some people may be sensitive to it.
How long do these treats take to set?
For the best results, let your coated Easter Bunny Coconut Tails chill in the refrigerator for about 1 hour. This time allows them to firm up and hold their shape beautifully, making them irresistible when served!
Easter Bunny Coconut Tails: No-Bake Fun for the Family
Ingredients
Equipment
Method
- In a large mixing bowl, whisk together the sweetened condensed milk, melted butter, and vanilla extract until smooth. Gradually stir in the medium shredded coconut and confectioner’s sugar until thick and sticky. Chill in the refrigerator for about 15 minutes.
- Divide the fine shredded coconut into small bowls and add 3-4 drops of liquid food coloring to each, mixing thoroughly.
- Scoop out approximately 1½ teaspoons of the chilled coconut mixture and roll it into a ball. Continue until all mixture is shaped into balls.
- Roll each ball in the colored coconut mixture to fully coat, then place them on a parchment-lined baking sheet.
- Chill the baking sheet in the refrigerator for about 1 hour to allow them to firm up.
- Serve the chilled Easter Bunny Coconut Tails on a festive platter and enjoy!
Leave a Reply